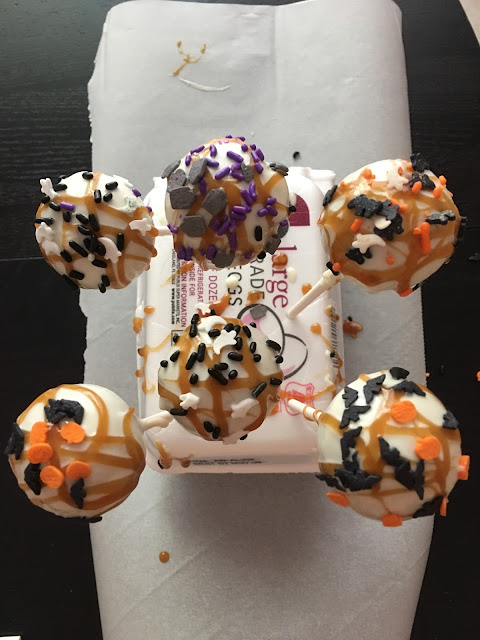
Spooktacular Salted Caramel Sauce Cake Pops


TGIF and Happy Friday, friends!! 

We have a busy festival filled weekend coming up! On Saturday we are heading to Lilburn Daze and bright and early Sunday morning we are picking up my mom and heading to North Georgia for the Georgia Apple Festival!!

I was flipping through my Taste of the South Holiday Baking Magazine the other night and came across (TONS of recipes) a super savory recipe for a salted caramel sauce. 

I've never actually made my own caramel sauce, and what better way to enjoy some fresh Georgia apples than in a delicious dipping sauce, so I thought I'd give it a whirl...two words, simple and delectable! 


I picked up these "Spooky Sprinkles" about a month ago at TJ Maxx and have been dying (no pun intended) to use them. What better excuse than some salted caramel drizzled cake pops!


  • 1 cup sugar
  • 1/4 cup water
  • 4 tablespoons unsalted butter, softened
  • 1/2 cup heavy whipping cream at room temp
  • 1/2 teaspoon of Kosher salt
In a saucepan, mix sugar and water. Let it boil over medium heat, WITHOUT stirring...you just want to stick a spoon in there and stir, but don't do it! Instead use a brush dipped in water and ring the sides of the pan to prevent a sticky sugary buildup. Once the sugar water mixture starts boiling it will change to a beautiful golden tan hue; at this point take off the heat and add the butter, cream, and salt. It's going to bubble like a cauldron, FYI--let cool to room temperature before using.

I poured mine into a Ball Mason Jar for easy storage! Yum!!


Cake Pops:

  • Cake mix
  • Lollipop sticks
  • Chocolate of your choice
  • Sprinkles


Super simple, whip up a cake recipe...I just used a vanilla cake mix I had in the pantry.


I use the Baby Cakes Cake Pop Maker. It's like a waffle iron for cake pops.


Let this bad boy heat up and start filling the round reservoirs.


Don't be an asshole, the clean up is killer. I find that a tablespoon in each little basin is a perfect amount. 

Let bake for 5 minutes, viola...cake balls!


Melt chocolate, dip end of lollipop stick into chocolate, stick into cake ball, and let cool--this acts like glue for the stick and cake.


Next, take your cake ball on a stick and roll it around the melted chocolate. Gently tap stick to remove any excess candy. Let them solidify "standing up." I have always used an old egg crate for this process, but I've heard that a Styrofoam block works much better.


Drizzle with salted caramel sauce.


Add sprinkles of your choice.


Refrigerate the cake pops until all candy coatings have completely hardened.


The salted caramel sauce adds just another decadent layer of flavor to these sweet pastries and the sprinkles give it a great fall baking vibe!!


Let them eat cake...pops!! 

Homemade Baby Food | Bartlett Pears


Baby food. We all ate it out of jars. We all turned out just fine.

Fast forward 30 years...

Baby food is now served out of plastic containers, you can get the jars...but it will cost you. Speaking of cost, $1.13 for a set of two plastic containers. Said plastic containers will also last you until the world ends...okay 2017, but you get my gist. 

My husband and I really enjoy cooking together.

I like to DIY. 

He likes spreadsheets. 

One night, after purchasing a plastic container of baby food, taste testing it, and calculations (done by him...not me), we decided we would give making homemade baby food a go!

Little did we know how easy, fun, and cost effective this process would be--not to mention the quality time we get to spend together!! You may throw up in your mouth now, but seriously we have such a fantastic time doing this as a couple!

We've made sweet potatoes, butternut squash, avocados, and now pears!

Bartlett Pears Homemade Baby Food:

To begin you need the following:
  • A steamer
  • Emersion blender, food processor, or blender
  • 4 ounce Ball Mason Jars and/or ice cube trays
  • Gallon plastic bag

Step 1: Peel pears.


Step 2: Core pears. **I would totally recommend purchasing an apple corer rather than using a knife. It will expedite the process**


Step 3: In a steamer that is boiling, add pears. Different directions I read had the pears steaming anywhere from 10-30 minutes. We checked every 5 minutes after the 10 minute mark until they were fork tender.


Step 5: Emersion blend. 


Step 5.5: After about 5 minutes of using the emersion blender, the super mushy puree we were looking for wasn't really happening...this is when we brought out the food processor.


Step 6: Check consistency. Add formula, breastmilk, or water to make the puree a bit more "soupy." We added 6 ounces of breastmilk. 


Step 7: Make an assembly line of jars and/or ice cube trays. I make sure to have at least 12 jars (enough for three feedings X four days) and then load up ice cube trays with any leftovers.


Step 8: This is the scathingly brilliant idea my hubby came up with...and he will be happy to tell you it was his scathingly brilliant idea!

When we were making our first batch of food, we were attempting to fill up the jars with tablespoons, of sweet potatoes nonetheless--hello stains everywhere and complete hassle! That's when he asked how I frost cookies. Not wanting to waste a piping bag, I whipped out a gallon plastic bag, he scooped in the remainder of the food in, snipped off the corner...and started squeezing equal amounts in each jar.

Proceed filling jars.


Step 8: With any leftover food fill up ice cube trays.

Fun fact: each cube is approximately one ounce. This makes measuring out frozen supply incredibly easy!


Homemade baby food will stay fresh in the refrigerator for 48 hours and frozen for 3 months! Now, I may not be really fantastic at math, but see if you can follow:

I purchased 3.12 pounds of Bartlett Pears for $3.09. After peeling, coring, and steaming we have a yield of approximately 24 ounces! 


Don't be fearful of making your own baby food--it is really, incredibly simple! And for those parents out there that do make it, weigh in on your thoughts! I'd love to hear from you!

Mommy Daughter Halloween


She may not be able to ring a doorbell. She may not be able to say "trick-or-treat!" But Maggie does have the cutest outfits for her first Halloween (and so does her mom!!). Halloween was always incredibly special when I was growing up and I plan on making it equally as spooktacular for Mags! 

I found this super cute "Keep the Tricks" onesie from Cuter Than Words on Etsy. The long-sleeved top has adorable orange glitter details and let's be honest, we are here for the treats! 


We will be "trick-or-treating" at my in-laws, my moms, and my sister-in-laws the day before and on Halloween we are going to be heading up to the university my mom works at for a Halloween costume contest and then heading over to my husband's office. We will have a busy few days so I plan on making (and doing a tutorial) her a sweet little tutu out of orange, black, and white tulle. I thought this would be perfect to change her costume up a bit.


I had a VERY successful shopping trip to Hobby Lobby. All their Halloween items were on deep discount so I snagged a cheeky large hair bow, my 1st Halloween bib, and the most charismatic cat diaper cover ever!


Even though Maggie isn't even remotely close to being able to consume candy...I will gladly help her with that with this adorable kitty cat treat bag from the Dollar Spot at Target!


Since I'm a mom now, Halloween costumes are a bit more umm...conservative, than they used to be in the past. Again, Etsy came through for a sister with this darling skeleton racerback tank from Wild Hearts USA (this shop has some seriously witty tops, guys!).


Another Hob Lob purchase is this batty for you scarf! Because one can never have too many scarves!


Halloween calls for a bit of whimsy--this polka dotted fascinator headband is also from Hobby Lobby.


Last but certainly not least, I talked about my love for Brin and Bell in my post of September Hits. Again, this store came through for me with this darling dainty skull bracelet--just the perfect amount of additional flair!


What are you and your kiddos dressing up for Halloween?